Unit 4 Exercise 8
Exercise 8: SubSchedule Daily and Monthly Process
Objective
To use Negative Frequency to prevent 2 container jobs from being built on the same day.
Summary
In a single schedule called, NightlyProcessing, you will have 2 container jobs each calling a unique sub-schedule, SS_Daily and SS-Monthly. One container called, Daily, will run every day except for the end of the month. The other called, Monthly, will run only at end of month.
Instructions
Create the Sub-Schedules
- In Library > Administration, select Master Schedules.
- Using the filters, locate and select SS-Repeating.
- Click Copy.
- In the Copy Schedule pop-up window:
- In the New Schedule Name field, enter
SS-Daily - Uncheck Navigate to the Studio page after copy.
- Leave Copy Jobs selected
- Leave Copy schedule privileges selected.
- Click OK.
- Repeat Steps 2-4 to create a new sub-schedule called, SS-Monthly.
Add Jobs to SS-Monthly
- Using the filters, locate and select SS-Monthly.
- Click the View.
- Utilizing the Copy function, copy Job 1 two times to create Job 6 and Job 7.
- Add Dependencies to have the new jobs run after Job 5 in sequential order.
- Job 1 → Job 2 → Job 3 → Job 4 → Job 5 → Job 6 → Job 7
- Click Back until you return the Schedule List
Create the Primary Schedule
- In Studio.
- Click Add.
- On the Master Schedule Definition screen:
- In the Name field, enter
NightlyProcessing. - In the Documentation field, enter This is the Main Schedule.
- In the Start Offset Hours box, enter
19(19:00 or 07:00 PM). - In the Work Days section, select Saturday and Sunday.
- In the Holiday Calendar Settings, select Use Master Holiday.
- Select Auto Build and set it as
7days in advance for1. - Select Auto Delete and set it as
7. - Click the Save button.
- Click Back
Add the Daily Container to the Schedule
- In Studio, select the NightlyProcessing and click the View button.
- Select Add Job in the side menu.
- On the Master Job Definition Screen:
- In the Name field, enter Daily.
- In the Job Type drop-down, select Container.
- In the Master SubSchedule dropdown list select the SS-Daily.
- Click the Save button.
- Click the Lock icon in the upper right-hand corner.
- In the Documentation field, enter in some documentation.
- Example: This is a container Job that has the Daily Jobs.
- Scroll to and expand the Frequency box.
- Select the EOM-O Frequency and move it from the Inactive list to the Active list.
- Select the Mon-Sun-O Frequency and move it from the Inactive list to the Active list.
- Select the EOM-O in the Active column and give it a Job Build Status of Do Not Schedule.
- Click the Save button.
- Click Back
Add the Monthly Container to the Schedule
- In Studio, select Add Job in the side menu.
- Click the Add button.
- On the Master Job Definition Screen:
- In the Name field, enter
Monthly. - In the Job Type dropdown, select Container.
- In the Master SubSchedule dropdown, select the SS-Monthly.
- Click the Save button.
- Click the Lock icon in the upper right-hand corner.
- In the Documentation field, enter in some documentation.
- Example: This is a container Job that has the Monthly Jobs.
- Scroll to and expand the Frequency box.
- Select the EOM-O Frequency and move it from the Inactive list to the Active list.
- Click the Save button.
Build the Schedule
- In Operations, select Schedule Build.
- On the Schedule Build screen:
- In the Schedule Date section, select today's dates for From and the end of the month for To using the Calendar Icon.
- In Schedule Build section, select the Released option .
- In the Schedule List, select NightlyProcessing.
- Click the Build button.
- On the Build Results screen, click Back.
- On the Operations Summary screen, click on Processes.
- Locate today's date and select it.
note
- Notice that:
- The schedule isn't running because the Start Time is 7:00PM.
- That only the Daily job was built.
- That only the SS-Daily sub-schedule is in the Schedule Selection list.
- Locate the date for the end of the month and select it.
note
- Notice that:
- The schedule isn't running because the Start Time is 7:00PM.
- That only the Monthly job was built.
- That only the SS-Monthly sub-schedule is in the Schedule Selection list.
- Force Start today's Nightly Processing schedule to allow the jobs in the sub-schedule to run.
Enterprise Manager
Details
Create the first SubSchedule (Daily)
- Under the Administration topic, Double-Click on Schedule Master.
- Click the Add button on the Schedule Master toolbar.
- In the Name field, enter SS-Daily.
- In the Documentation field, enter This is the Daily SubSchedule.
- In the Start Time box, notice the default of
00:00(midnight). - Keep Monday through Friday selected for the Workdays per Week for the Schedule to run.
- In the Schedule Properties frame, mark the SubSchedule checkbox.
- Click the Save button on the Schedule Master toolbar.
Create the SubSchedule (Monthly)
- Under the Administration topic, Double-Click on Schedule Master (if not open).
- Click the Add button on the Schedule Master toolbar.
- In the Name field, enter SS-Monthly.
- In the Documentation field, enter This is the Monthly SubSchedule.
- In the Start Time box, notice the default of
00:00(midnight). - Keep Monday through Friday selected for the Workdays per Week for the Schedule to run.
- In the Schedule Properties frame, mark the SubSchedule checkbox.
- Click the Save button on the Schedule Master toolbar.
- Close the Schedule Master tab.
Add Jobs within the Daily SubSchedule
- Under the Administration topic, Double-Click on Job Master. Select the SS-Daily.
- Click the Add button on the Job Master toolbar.
- In the Name field, enter Daily Job 1.
- In the Job Type drop-down list, select
Windows. - In the Primary Machine drop-down list, select the
SMATrainingmachine. - In the User ID drop-down list, select
SMATRAINING\SMAUSER. - In the Command Line, use Ctrl+F and select the command line that looks like this:
"[[MI.PathWindows]]\genericp.exe" -t[[SI.RUNTIME]] -e0 - Click the Save button on the Job Master toolbar.
- Click the Frequency tab.
- Within the Frequency list frame, click the Add button.
- Click inside the option button to Use existing Frequency.
- In the Frequency drop-down list, select
Mon-Fri-N. - Click Next.
- Click the Finish button.
- On the Job Master Toolbar, click the Copy button or press Ctrl+Insert).
- Name the Job Daily Job 2.
- Click OK.
- Repeat steps 32 to 34 to create Jobs Daily Job 3, Daily Job 4, and Daily Job 5.
- Close the Job Master.
- Use Workflow Designer to create Job Dependencies the way you want and then close Workflow Designer.
Add Jobs within the Monthly SubSchedule
- Under the Administration topic, Double-Click on Job Master. Select the SS-Monthly.
- Click the Add button on the Job Master toolbar.
- In the Name field, enter Monthly Job 1.
- In the Job Type drop-down list, select
Windows. - In the Primary Machine drop-down list, select the
SMATrainingmachine. - In the User ID drop-down list, select
SMATRAINING\SMAUSER. - In the Command Line, type Ctrl+F and select the command line that looks like this:
"[[MI.PathWindows]]\genericp.exe" -t[[SI.RUNTIME]] -e0 - Click the Save button on the Job Master toolbar.
- Click the Frequency tab.
- Within the Frequency list frame, click the Add button.
- Create a new Frequency. The name will be
End-of-Month-B. Click Next. - In the Frequency Definition Wizard, select End of Period in When to Schedule frame, be sure that Month is selected under Periods frame and Before Date is selected under A/O/B/N frame.
- Click the Finish button.
- On the Job Master Toolbar, click the Copy button or press Ctrl+Insert.
- Name the Job Monthly Job 2.
- Click OK.
- Repeat steps 51 to 53 to create Jobs Monthly Job 3, Monthly Job 4, Monthly Job 5, Monthly Job 6, and Monthly Job 7.
- Close the Job Master tab.
- Use Workflow Designer to create Job Dependencies.
- Close the Workflow Designer.
Create the Primary Schedule
- Under the Administration topic, Double-Click on Schedule Master.
- Click the Add button on the Schedule Master toolbar.
- In the Name field, enter Main-Schedule.
- In the Documentation field, enter This is the Main Schedule.
- In the Start Time box, notice the default of
00:00(midnight). - Keep Monday through Friday selected for the Workdays per Week for the Schedule to run.
- Click the Save button on the Schedule Master toolbar.
- Close the Schedule Master tab.
- Under the Administration topic, Double-Click on Job Master.
Add the Daily SubSchedule to the Primary Schedule
- Select the Main-Schedule from the Schedule drop-down list.
- Click the Add button on the Job Master toolbar.
- In the Name field, enter Daily-Jobs.
- In the Job Type drop-down list, select Container.
- On the Schedule to run as SubSchedule drop-down list select the SS-Daily.
- Click the Save button on the Job Master toolbar.
- Click the Frequency tab.
- Within the Frequency list frame, click the Add button.
- Click inside the option button to Use existing Frequency.
- In the Frequency drop-down list, select
Mon-Fri-N. - Click Next and then Finish.
- Click the Instance Definition tab.
- Click in the Define Property Values box.
- Enter:
RUNTIME=10 - Click the Add at the right-middle of the screen.
- Click the Save button on the Job Master toolbar.
- In the Documentation field, enter This is a container Job that has the Daily Jobs.
- Click the Save button on the Job Master toolbar.
- Still on Job Master, be sure you have the Main-Schedule selected.
Add the Monthly SubSchedule to the Primary Schedule
- Click the Add button on the Job Master toolbar.
- In the Name field, enter Monthly-Jobs.
- In the Job Type drop-down list, select Container.
- On the Schedule to run as SubSchedule drop-down list select the SS-Monthly.
- Click the Save button or on the Job Master toolbar or press Ctrl+S.
- Click the Frequency tab.
- Within the Frequency list frame, click the Add button.
- Click inside the option button to Use Existing Frequency.
- Select
End-of-Month-Bfrom the drop-down list. - Click Next.
- Click the Forecast button and note that on the months noted above that the Job will run on the Friday before the end of the month if it falls on a weekend.
- Close the Forecast dialog box and then click Finish on the Frequency Definition Wizard screen.
- Click the Instance Definition tab.
- Click in the Define Property Values box.
- Enter:
RUNTIME=20. - Click the Add at the right side of the Define Property Values frame.
- Click the Save button on the Job Master toolbar.
- Close the Job Master tab.
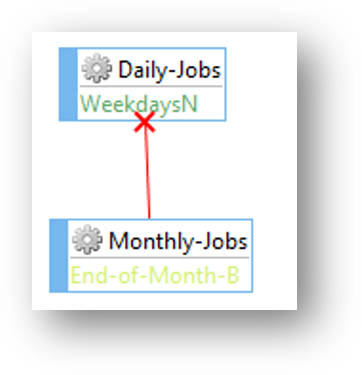
Setup Job Dependencies between Container Jobs
- Under the Administration topic, Double-Click Workflow Designer.
- Select Main-Schedule under the Select Schedule drop-down list.
- Click the Add Dependency tool.
- Click the Daily-Jobs box and then click the Monthly-Jobs.
- Select Excludes under the Dependency type.
- Click OK.
- Close the Workflow Designer tab.
Build the Schedule
- Under the Operation topic, Double-Click Schedule Build.
* Notice that **both SubSchedules _ARE NOT_ shown in the Schedule Selection** list.
- Click the Main-Schedule and click the Build button.
- On the Build Properties screen, leave On Hold selected and click OK.
* This will build the Schedule **On Hold** for today
- Click the Main-Schedule again.
- On the Start date, select the last working day of the month.
* The **Stop date** should be the same as **Start date**.
- Click the Build button.
- On the Build Properties screen, leave Released selected and click OK.
* This will build the Schedule **Released for the end of the month**.
- Close the Build Schedules screen.
- Go to the List or Matrix view under the Operation topic or use Solution Manager to check the results.
- Release the Schedule for today (if you want to see the Jobs running).